Besides measurements of some properties, the experiment in AFM may consist in the research of the evolution of the sample in time, or investigation of the impact of a temperature, mechanical forces or chemicals. In many cases researches of the magnetic and electric properties need to be conducted in external electric and magnetic fields.
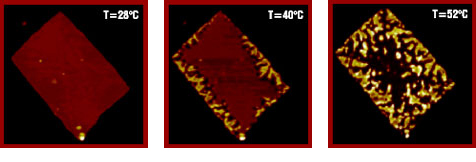
| Fig. 1. Topographic tapping mode AFM images (13x13µm2) show the morphological evolution of a single crystal of PDPS as a function of temperature. Concurrently measured electron-diffraction patterns demonstrate the transformation of the pseudotetragonal R phase of PDPS into the hexagonal columnar mesophase (R.I Gearba, et. all., Macromolecules 39, 978-987 (2006)). Images are courtesy of Dr. D. Ivanov. |
 |
The experiment in AFM begins with sample preparation, AFM probe selection and setting up the microscope. Attention should be payed to imaging artifacts that appear as a sharp change of contrast or appearance on identical shapes in various parts of the image. These artifacts can be caused by change of the AFM tip condition and shape due to picking an occasional contamination particle or breaking an AFM tip apex that happens when the AFM tip hits a big structures whose height is larger than the vertical range of the scanner employed in the microscope. Therefore, the samples should be stored carefully to avoid various contaminations, and scanners with large range of vertical displacements should be used, especially for examination of rough surfaces.
The AFM probe engagement is the first important procedure to prevent AFM tip damage. An example of a careful engagement procedure is described in high-resolution imaging page.
Of course, in quantitative AFM studies it is important to have the microscope scanners properly calibrated. We suggest using the calibration standards TGXYZ for proper adjustments of the X, Y and Z sensitivity of the scanners.
Depending on the particular task, imaging routines have their specifics. A few of them are described below.
Topography imaging
Visualization of surface topography is the main function of AFM. The success of the experiment depends not only on a correctly chosen AFM probe but to a large extent on the optimal imaging routine. A minimal tip-sample force, a properly adjusted feedback and an appropriate scanning rate are a combination of important parameters for the most precise topographic imaging.
At the end of the topography studies of the particular area, it might be useful to make a final scan on a large area that includes the location where the scans were made. In some cases it can be found that imaging of the smaller area left a "window" seen in the large scan. This will be a strong indication that the tip-force should be reduced. How to control the tip-sample force in tapping mode is described in some details on the topography imaging page.
Exploring Materials Morphology and Structural Order
Besides high-resolution topographic information, AFM imaging of ordered structures and heterogeneous materials substantially provides visualization of surface morphology and nanostructures thus complementing other microscopic and diffraction techniques.
In many cases, visualization of ordered structures and compositional imaging of individual components in complex materials are achieved by imaging at elevated forces. This happens in visualization of lamellar order of alkanes and semicrystalline polymers, microphase separation patterns of block copolymers, morphology of elastomer blends, etc. It is not rare that the top surfaces of multicomponent polymer materials are enriched with low-molecular weight material and ordered lamellar structures are hidden underneath. In this case, scanning at low tip-force reveals only structure of the top layer formed of amorphous polymers and imaging at elevated forces leads to images showing sub-surface ordered structures. This is the case when imaging at elevated forces might provide images with well-resolved structures contrary to imaging at low forces. For samples with a rubbery top layer, which can be penetrated by an AFM probe at elevated forces, it is of interest to know at what sub-surface depth a particular image was obtained. This information can be gained from analysis of force-curves.
More details can be found on the Materials Composition Mapping page.
Examination of Local Mechanical Properties
AFM nanoindentation experiments can be conducted as follows. First, a sample area where indents will be made should be imaged preferably in tapping mode to avoid tip-induced sample modification. When a homogeneous material is studied this allows checking its topography and avoiding occasional surface imperfections that might influence indents. In case of heterogeneous samples a choice of area is important when the mechanical properties at interfaces between different components are examined.
While making indents the force curves are collected and later used for extracting force versus penetration curves. Usually, the indents and corresponding force curves are collected in a large number of locations and various levels of the tip-force. The AFM tip indents should be made in different locations, which should be spaced far from each other to exclude interference of the indents. For homogeneous materials, this procedure provides the statistically-sound force curve data leading to reliable estimates of the elastic modulus. In the examination of heterogeneous materials, more challenges are faced. First of all, they are related to compromises between spacing the indents and the desire to examine the interfaces between the different materials. Second, heterogeneities in bulk demand a more careful assignment of the force curves obtained at different locations. In many cases the thickness of the top material is unknown and the force data might be influenced by another material situated underneath.
After the indents are made, their shapes are visualized with AFM either using the same AFM probe that was employed for indenting or using a new and sharper AFM probe. The observation of the indented locations provides important information about the nature of the indent. In case of elastic deformation the material will practically recover in full and the pits will be barely seen. A partial recovery of the indent takes places for non-elastically deformed materials and a presence of pile-ups at the indent pit indicates a plastic flow developed during indenting. This information should be considered for selecting the appropriate model for extracting of quantitative mechanical data from force curves.
In addition to the choice of a theoretical model, the quantitative analysis of the force curve requires also knowledge about the AFM cantilever stiffness, AFM tip geometry and optical sensitivity of the instrument for the particular AFM probe. The AFM probe stiffness is usually measured from the AFM probe's thermal excitation. The geometry of the AFM tip can be deduced from TEM or SEM micrographs either provided by the AFM probe manufacturer or measured by the AFM user. This is much easier to do for AFM probes with round-shaped tip apex. The optical sensitivity is usually measured from force curves obtained on a rigid substrate (e.g. sapphire) after the indenting experiments. This procedure should be made with extreme caution to avoid AFM tip damage. Again, in this procedure it is much easier to handle AFM probes with a rounded AFM tip apex.
The reason why compositional imaging and indenting experiments in AFM are often made on polymer materials is related to the fact that in general the stiffness of commercial non-AFM probes and the stiffness of AFM probes are the same range. There are two additional consequences. First of all, due to the wide spread of stiffness values of polymer materials there should also be a wide selection of AFM probes with different stiffness values in order to choose the most appropriate AFM probe for compositional imaging of a particular polymer multicomponent material. Second, for nanomechanical examination of biological objects and, particularly, cells AFM probes which operate at much smaller loads should be used. Due to definite limitations in reducing stiffness of the AFM cantilever one might concentrate on the use of round-shaped beads, which can be attached to the cantilever instead of AFM tips. The beads of micron size can be glued to tipless AFM probes.
You can find more details on the mechanical properties page.
Studies at Different Temperatures
AFM imaging of polymer samples at different temperatures is used for visualization of phase transitions (melting, crystallization, etc) and direct monitoring of structural changes following thermal annealing. Practically, such imaging is performed after the sample temperature has changed and stabilized. To prevent moisture condensation dry environment of the sample is needed at sub-0°C temperatures. This is achieved by purging the heating cell with dry gas. At high temperature purging with an inert gas might be need to avoid sample oxidation. In the imaging at elevated temperatures the AFM probe is heated through direct tip-sample contact in contact mode. In the tapping mode, heating of the AFM probe is done with an additional heater and this prevents condensation of moisture on the probe that is colder than the sample and condensation of volatile components that might exude from the sample. The heating of the AFM probe makes it difficult to use AFM cantilevers with reflective Al coating due to the AFM cantilever bending (bimetallic effect). Additionally, during scanning at high temperature one should be aware about possible increase of sample adhesion. This might restrict the use of soft silicon AFM probes. Therefore, for temperature measurements we recommend non-coated Si probes with stiffness in the range 5-40N/m.
Imaging in Different Environments
AFM imaging in gas or vapor atmosphere is usually performed with the same probes used in ambient conditions. The situation is different when imaging under liquid, especially when studies are performed with oscillatory or tapping modes. Due to the fact that driving of the AFM probe in liquid usually proceeds at the clean resonance frequency the tip-force is not well-controlled. Therefore, in studies under liquid one is limited to soft silicon AFM probes with stiffness below 5N/m. Therefore, our AFM probes in the stiffness range from 0.3N/m to 5N/m can be used in oscillatory modes in measurements under liquid.
Further reading
Topography imaging
Material composition map
Mechanical properties
Electric properties
Magnetic properties
